[If you don’t care how sharpening works (you really should…), then you can skip this and read Part Two: Techniques. …JMG.]
The Expectations
We’ve all seen the cop shows in which the hero has discovered some video footage or a traffic camera photo (etc) that shows the perpetrator in the act, and the resident computer guru zooms in on the perp’s face, revealing a pixelated mess. At this point in the story, the hero says “Can you enhance that?” and the guru replies “Of course!” and after a few keyboard clicks, the image suddenly resolves into perfect clarity.
Anyone who has spent any time with digital images probably already understands that this scenario is (unfortunately) complete nonsense. There is nothing that you can do to a photo that will give you more information than you had when you started. If the face is described by 4 pixels, you’re never going to distinguish the eyes. The only way to get more information in an image is to take a better photo.
That said, there are limits to what information the human eye (and brain) can detect. One point of sharpening is to highlight that detail which exists in the image but is not immediately discernible. It is also true that we are much better at visually detecting edges when there is strong contrast between the edge and the background (eg, black on white rather than grey on grey). The second goal of sharpening, then, is to increase edge contrast in an image, which consequently makes the image appear sharper. How is this done?
The Unsharp Mask
UN-sharp? That’s right. Don’t let the name fool you… the unsharp mask is a sharpening tool, and it’s been available in Photoshop for ages. Photoshop CS and later versions also have “Smart Sharpen”, which is unsharp mask with the addition of some new features. Unfortunately, it’s not smart enough to sharpen your photos by itself; to get anything out of it, you’ll first have to understand how unsharp mask works.


The fundamental idea behind unsharp mask is that it finds the edges between light areas and dark areas and then amplifies the contrast at the edge by adding a brighter “glow” on the bright side, and a darker “shadow” on the dark side. The greater the difference in brightness to begin with, the stronger the new glow/shadow will be.

In practice, this means that details with recognizable edges will be emphasized by the process, while smooth tonal changes and regions of relatively solid color will be unaffected.
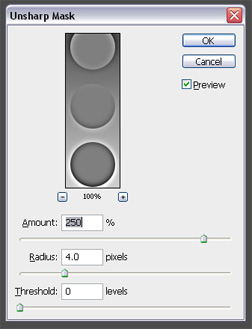
Figure 3 shows the unsharp mask dialog box that controls how these settings are applied. The amount slider controls how intense the new halos are going to be; higher values mean that the “shadows” will be darker and the “glows” will be whiter, while smaller values lead to a more subtle effect.
The radius slider controls how thick the new halos are. Needless to say, the larger the pixel value, the larger the effect.
Finally, the threshold slider determines how much of a difference between two tones there must be before unsharp mask will apply its effect. As you increase the slider, similar tones are increasingly ignored.

For figures 1-3, I’ve applied settings that are outrageously strong to demonstrate the theory. The circles are all the same tone of medium grey, but the background is a gradient between black and white. Notice that as the circles near the top and bottom of each image (and consequently contrast more with the background), the effects of the unsharp mask increase as well. At the top of the 4th circle, where the tones are most similar, there is a point at which there is no effect at all.
For figure 4, I raised the threshold by 30 levels (on an 8 bit scale where 0 is black and 255 is white). Consequently, where the tones between the background and the circles are fewer than 30 tones different, there is no unsharp mask effect at all. Once the tonal differences exceed 30 levels, however, the effects begin again, but as though the tones are 30 levels more similar than they actually are.
At this point, it should be clear that, although it is possible to make details more distinct (as we can see in the center circles of figure 2), we do not get any additional information in the photo by sharpening. In fact, sharpening destroys data by blowing out highlight detail and burying shadow detail in the regions adjacent to edges effected by the sharpening. This data loss, however, is so minimal when sharpening is performed properly that it is acceptable (and usually advisable).
Given that this is how sharpening works, in theory, how is it best applied? For details on practical application and technique, come back for part 2 of this sharpening series, where I’ll demonstrate the techniques on actual photographs, explaining how to adjust the settings for a different photos, and how to sharpen selectively.


